With Christmas coming up fast and having 3 nieces under the age of 4 and our first baby on the way I've decided to put my hands to a few kids pieces. the first being a Paul Frank inspired Log Rocker.
It'll function like a see-saw once its done with handles at either end so up to two kids can be using it at the same time.
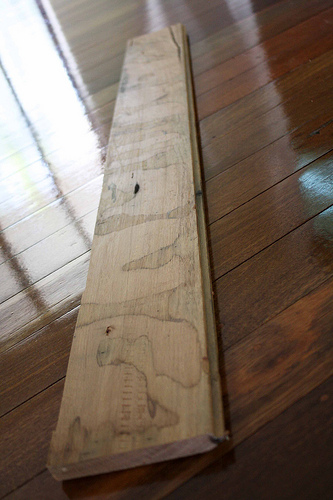
I made some headway today with preparing the panel and kerf cutting in preparation for tomorrows steaming and torturing session. All done with hand power tools, other than the router table for the round over edges.
I'll post more pics as things progress, but here's a few for now.
ps. I love my DIY router table, I don't know what I'd do with out it now.
[FIRST DAY - 3 hours of work]
hand cut template:

round over edges:

circular saw cut kerfs:

Prepped Panel:

kerfing experiment (failure):

kerfing experiment (win):

kerfing experiment (win), and I love the ribbing effect:

I've created a form to wrap the final piece around and once I steam it I'm expecting the ribbing effect to be less than the dry hand bend I did in the pictures above. even if I end up with the ribbing in the final piece I'll be happy as I kinda love the odd look it gives the wood.
This week I will spend some time laminating to smaller sheets together which will form the handles at each end. I've just got to decide how I will connect the handles to the the top panel. I'm leaning towards mortise and slotted tenon style interface with wedges on the underside to spread the tenon and lock it into place. I don't want to use any metal hardware if possible.
[NEXT DAY - 5 hours of work]
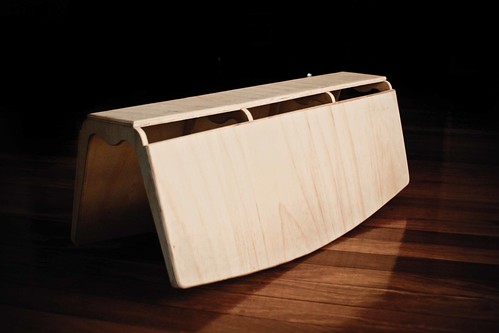
Doing everything by the book, soaking with hot wet towels, steaming, and continued heat application while bending - I got about 90% of the bend done when I heard a SNAP. much disappointment.
I had to modify the design buy cutting the panel into three sections to complete the project. The good news is that the rocker can take the weight of an adult (90kg) and a child (15kg) at the same time, while giving it a red hot crack at trying to break it.
I've got another piece of 840x840x12mm ply that I'll attempt to do the bend again next weekend (if the baby hasn't arrived by then). This one will be soaked for 24hrs prior to steaming/heat application.
It's only scrap wood so I don't really care to much if it fails again. Ideally I'd be using thinner laminates for bending but its fun trying something new.
Anywho, here's some pics of it after the failure of the bend. not a complete loss but no where near as nice as I'd hoped for. I am still toying with the idea of cutting thin strips and chamfering the edges of each to fill the gap. Then sand to the final shape and fill the gaps with sawdust/glue mixture. Here it is in its current form, together and rough sanded with 80 grit.
It kind of reminds me of Noah's Ark, or as I would imagine the Ark to loosely look like. As you can on I still need to shape the insides a little bit. I'll refine the design with the next one I Keeping my fingers crossed for a better result from the kerf bending. I may make a jig to help with the bending process if time permits.