Thursday 9 December 2010

Router Surfacer / Planer


I’m in the process of making some finger jointed boxes but to do so I needed to rip some planks in half to get the thickness I needed. The challenge I had was ripping 1500mm long planks that were 19mm thick and 110mm wide. My circular saw only cuts to a max depth of 65mm and I don’t have a table saw. My only option was to make some bench buddies to hold the planks up and against the side of my work table and then make two passes on the plank with the hand held circular saw. It’s very ghetto and was never going to produce a nice cut but I had no other option. So I proceeded to rip down the middle of the 19mm plank, flip it over and rip down the other side. Very early on I noticed that the wood wanted to fold in on itself behind the blade as I made the first and second cuts. To overcome this I cut some 3mm shims from hardwood post I had laying about and as I cut along I slipped a shim in behind the blade every 100mm or so. This was quite effective in preventing the cut wood from clamping on the back side of the blade which was causing the timber to burn.

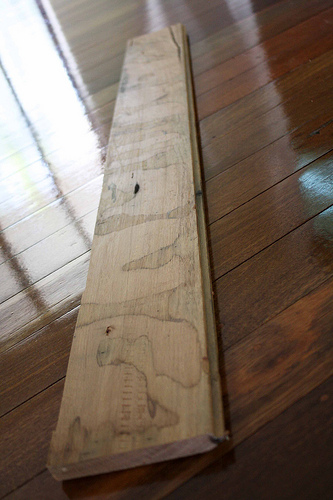
With the planks cut in half I was left with a lovely set of saw/tool marks, burning and a groove where the wood had shifted during the process of flipping it over for the second cut. It was never going to be perfect but I’d hoped for a nicer initial result than what I got. So, I jumped online and began looking for thicknessers and was astounded at the cost of the machine and the cost of the replacement blades and parts. I am not in a position to be spending that kind of money on something that is going to only be used every so often. This presented me with challenge two for this project – how to surface the material and get it to a uniform thickness using what I had laying around in the man cave (aka workshop).

I got thinking, rather dreaming, about how far away my CNC is from being started and had an idea to make a manual sled to move the router around. What followed were some sketches for a 2 axis manually controlled router sled system. The idea being that the X axis was long enough to do a whole plank in one pass and wide enough in the Y axis so that it could do a few planks at the same time. Using the sketch I began looking at what I had available in the scraps pile to see if I could get it to work. It turns out that I did have all the materials to make the basic sled (minus the bearings to make the linear carriages slide nicely).

So I set about using:
-          1x old laminated chipboard cupboard door
-          3x 25x22x1.8mm aluminium extrusions (that I had first used for the proposal to my whifey)
-          Some 6mm (1/4”) polycarbonate/plexiglass
-          A handful of screws

I did place an ebay order for the bearings and my father in-law was kind enough to get me some M8 bolts from Bunnings while he was there. The total cost of all of that is well below $50.

Initially the sled was made to slide on wooden pads so that I could get a piece of plank surfaced nicely. Since then I’d received my order from ebay and I set about drilling and tapping the bearing carriages. BAM! I’d made a boo boo here by not considering the additional height the bearings would add to the whole assembly. It effectively put another 2” distance between the cutter and the material hold downs. As a result I had to modify the Y axis carriage so that the router base sat inside and at the bottom of the Y axis rails – where as it was on top of the rails initially. I’ve also had to modify the X axis carriages so that Y carriage sits closer to the X axis rails. Not a huge problem but it has since limited the movement of the Y axis – something I’m hoping to overcome with a few more modifications to the Y carriage and rail assembly.

With it now complete I can surface anything, including horribly uneven and figured timber, that is 1900mm x 430mm x 35mm. The best thing about the design of this unit is that I could easily increase the Z distance/clearance by adding a series of spacers to the bottom of the existing X rails. I’m thinking some pre-cut and pre drilled mdf strips will work really well for this and having them ready to go will make it easy to lift the X rails in increments of 9mm and 12mm (depending on which pre-cut strips I combine).

I am eager to see if I can use a template with this jig to do some nice engraving work on my finished pieces. More to come on that should I be successful (or if it fails).

My next mission is to create a circle cutting jig for cutting circles that are smaller than 300mm OD. My current sketches suggest I can cut a circle that is 1mm OD – provided I could get a cut work piece that small to stay put and not be shredded by the spinning router bit. In reality something as small as 5mm should be easily cut with my 3.17mm (1/8”) carbide end mills.


The original setup with wooden slides. This was upgraded once the bearings turned up from ebay.


The original piece including burns, tool makes and grooves.


The surfacing half way through the process


The finished work piece. nice n smooth


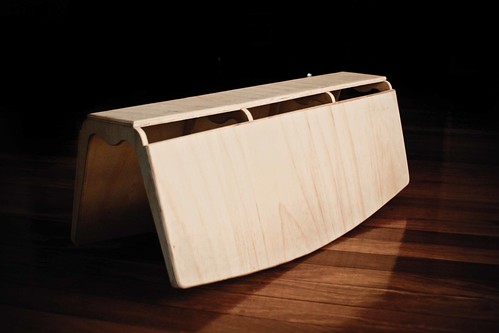
The whole assembly and finished work piece


A comparison (original on top, finished workpiece below)


The upgraded bearing rail assemblies


a short video of the diy router  surfacer / planer

Saturday 13 November 2010

MDF Name Plaques / Door Plaques

Not much to say about these other than I quickly made these MDF name/door plaques a few minutes prior to making the hardwood soap holders.


Hardwood Soap Holders

The baby still hasn't arrived so I made use of the available time and spent the day playing with my diy router table. Darn I love this piece of kit, so versatile.

In our house we don't buy other family members presents, rather we make presents instead. With the family being so large it is way to costly to buy stuff for everyone. I made a number of other things today including a few shelves (with sliding dovetail supports) and some simple MDF plaques for kids doors (the wife is going to paint and put their names on them). However, the things I wanted to share are some hardwood soap holders.

I can't for the life if me remember what type of wood it is, maybe someone can help ID it? I took one length of hardwood floor board and made 9.5 soap holders. I'll do it all over again tomorrow and I should be done with some of the gifts for the family - for this year.

I'm also not sure what kind of sealer/finish to give them - if any at all.

Enjoy the pics.


Wednesday 3 November 2010

Log Rocker - 8 hour experimental project

With Christmas coming up fast and having 3 nieces under the age of 4 and our first baby on the way I've decided to put my hands to a few kids pieces. the first being a Paul Frank inspired Log Rocker.

It'll function like a see-saw once its done with handles at either end so up to two kids can be using it at the same time.

I made some headway today with preparing the panel and kerf cutting in preparation for tomorrows steaming and torturing session. All done with hand power tools, other than the router table for the round over edges.

I'll post more pics as things progress, but here's a few for now.

ps. I love my DIY router table, I don't know what I'd do with out it now.

[FIRST DAY - 3 hours of work]

hand cut template:

round over edges:

circular saw cut kerfs:


Prepped Panel:


kerfing experiment (failure):

kerfing experiment (win):

kerfing experiment (win), and I love the ribbing effect:

I've created a form to wrap the final piece around and once I steam it I'm expecting the ribbing effect to be less than the dry hand bend I did in the pictures above. even if I end up with the ribbing in the final piece I'll be happy as I kinda love the odd look it gives the wood.


This week I will spend some time laminating to smaller sheets together which will form the handles at each end. I've just got to decide how I will connect the handles to the the top panel. I'm leaning towards mortise and slotted tenon style interface with wedges on the underside to spread the tenon and lock it into place. I don't want to use any metal hardware if possible.


[NEXT DAY - 5 hours of work]
Doing everything by the book, soaking with hot wet towels, steaming, and continued heat application while bending - I got about 90% of the bend done when I heard a SNAP. much disappointment.

I had to modify the design buy cutting the panel into three sections to complete the project. The good news is that the rocker can take the weight of an adult (90kg) and a child (15kg) at the same time, while giving it a red hot crack at trying to break it.

I've got another piece of 840x840x12mm ply that I'll attempt to do the bend again next weekend (if the baby hasn't arrived by then). This one will be soaked for 24hrs prior to steaming/heat application.

It's only scrap wood so I don't really care to much if it fails again. Ideally I'd be using thinner laminates for bending but its fun trying something new.


Anywho, here's some pics of it after the failure of the bend. not a complete loss but no where near as nice as I'd hoped for. I am still toying with the idea of cutting thin strips and chamfering the edges of each to fill the gap. Then sand to the final shape and fill the gaps with sawdust/glue mixture. Here it is in its current form, together and rough sanded with 80 grit.


It kind of reminds me of Noah's Ark, or as I would imagine the Ark to loosely look like. As you can on I still need to shape the insides a little bit. I'll refine the design with the next one I Keeping my fingers crossed for a better result from the kerf bending. I may make a jig to help with the bending process if time permits.

Thursday 28 October 2010

Moses Rocker

This is going to be a short and sweet posting about a recent item I've made in preparation of our upcoming baby. Tonight's post is about what I'm calling the 'Moses Rocker'. Most people have heard of Moses before, even if they aren't Christian, and some are familiar with the story of moses being found in a basket. The basket has continued to be used and has somewhat become of popular item with many being sold across varying stores all over the world.

However, I didn't make the basket in this instance - I chose to purchase one. The rocker though was an item that I had considered buying but after seeing the boring designs available and the stupidly high prices; I elected to make one from scrap plywood I had in the man-shed.

The resulting Moses Rocker can be seen in the following eye candy, enjoy.

ps: stay tuned for some more items to be published in the coming couple of weeks as I prepare gifts for the family for Christmas.


Thursday 30 September 2010

A new place for my ideas (sketches mostly)

I recently had a birthday and a lovely friend of mine gave me this awesome paper book to store all of my ideas. I've been very nervous to use it though as it's paper based and I didn't want to trash it in my bag as I cycle to and from work each day. Last night my lovely wife was kind enough to give me a hand made leather book that her aunty made many years ago. This is now the home to my ideas center and is keeping it nice and safe as I travel around with it. With my ideas center close to me I am sure to capture everything as it comes to mind, no more forgotten ideas.


Designers - who's your inspiration?

This morning I became so very excited when I found out that my favourite architect has also designed some rather unique and interesting furniture items. I have no idea why I'd not come across it before and it shows that I need to be doing more and more research. The only problem is that I'm a hands on person rather than a research and reading kind of person. I'd much prefer to build but I realise that without knowledge anything I do make could and most likely will be fundamentally flawed. Fruthermore, I do beleive that in order to take something to a new level you first need to know where it's come from and how it got to be what it is now to truly appreciate what ever it is. This is a process that i've applied (and continue to apply) to my swing dance teaching and exploration of european ballrooming and traditional american blues dancing. It is important to me that something isn't merely misappropriated for the short term gain of a misinformed and uneducated individual and/or group (which has happened unfortuantely in the Australian dancing scene). As such, I vow to do the appropriate research and educate myself as much as possible in order to be a positive contributor to the furniture making industry.

Potential Fibres

In my quest to ensure that every aspect of this next project is sustainable and environmentally friendly I set about searching for solutions to padding/cushions for the stools. Initially I thought I could use Wool Felt but after investigating sources for it here in Australia I'm going to be flagging it as an alternative due to the cost and processing. I don't realistically see it being a cost effective way of going despite how easy it would be to work with. However, I'm remaining open to the idea on the off chance that I come across someone local that can help me with the specifications I need.

The next on my list of potential, and very high on that list, is Kapok. This fibre is currently being organically, ethically and sustainably farmed in Java Indonesia with one supplier claiming that a second plantation is in the works for Sumatra. Being an overseas source I would be going against one of my greatest desires of using locally produced materials. BUT! After looking at the properties of Kapok, I am very interested in how I could use it for this project and future projects. Perhaps I can look at the supply chain and see how good that is to better determine the viability of such a material for use in my projects.
Once I sort out the padding situation I'll need to sort out the coverings for the padding, something I'm hoping to approach a textiles designer by the name of KT Doyle about. The work that KT does is nothing short of inspirational - be sure to check out her blog.

I still need to do a lot more research in to the possible fibres that would be suitable for stool padding/cushions and am hoping I come across something that is fairly easily sourced, not to expensive but more importantly is friendly to the environment. If any of you out there know of materials or suppliers that might be able to assist please let me know by posting a comment to this post. Sorry, no eye candy in this blog post but I will be posting more as it comes to hand.

[edit]
Why I didn't mention this earlier but Bamboo is also on the cards as a potential fabric/wadding. There are a number of options out there for bamboo fabrics and waddings. The material excites me, Big Kev style!

Tuesday 28 September 2010

Rocker Stool - inital concept

The other morning I finished some initial concepts for some rocker stools (which I've been playing with for about 3 months now) and decided to do a quick render of them - the lighting is bad and textures aren't right but you'll get the idea. This particular stool will be made primarily from Marine Ply or Bamboo and have a number of 10mm dowel rods running through them for both strength and aesthetic. While Marine Ply and Bamboo are the desired materials, I've come across some nice work by Ryan Frank that makes use of recycled ply, particle board and other materials. His work is challenging my idea of the optimum materials to use, something that I will need to sort out in the coming months.What isn't showing in the render is some of the finer detail which I've intentionally left off, I don't want to give everything away. :)

The purpose of a rocker stool is to overcome what appears to be an inate desire almost every person has - which is to rock on any stool from the moment they site down. Through my observation and conversation it has become fairly clear that people have a tendancy to sit down and throw their pelvis back, thus lifting the front legs of a stool. Worst yet is I see people sit down and throw their hips from side to side which creates a harsh rocking motion from one side of legs to the other. Why people do it I don't know, but I do know that it quickly reduces the life expectancy of stool legs and places a load in a direction that most stools are not designed to. The rocker stool will attempt to address these load issues and user desires in a somewhat aesthetic manner (see note above about deliberately leaving detail out of the render).

The rocker stool can be flipped over to be a stationery stool should the user not wish to have the rocking motion. I see this stool's working life to be mostly in cafe's and funky little coffee joints around the world yet being an accessible and viable piece in anyone's home. Whilst I am showing a bare wood stool below, there will be a felt padding that can be attached to either side of the chair via magnets. When not in use the magnets will hold this felt to the underside of the seat area. Both seat areas have a a small lip on the underside to allow for magazines and newspapers to be placed into the base without the sliding out while rocking.


As always here's your eye candy:


Thursday 23 September 2010

Slotted Design as a construction method

Today I spent a little more time researching the use of slotted panels as a construction technique and stumbled across an example that further confirms my early tests. The following example is an illustration of just how solid, sturdy and reliable the structure is while under force. I'm almost convinced that this could be an avenue to explore further with some of the current designs I'm playing with. The comfort level 'looks' to be ok but without actually making some prototypes it will be hard to determine the correct spacing for the grid. Too far apart and it will be mighty uncomfortable, too close together and excessive materials / construction time become a limiting factor.

Food for thought and something I'm definitely going to be exploring further. For now though enjoy the eye candy from the Chick 'n' Egg chair by Manuel Kretzer. Hard to believe that it is 100% cardboard.


The designer suggests that the form was completely modelled in Rhino with further support coming from Grasshopper. Having already experimented in this kind of construction in a 3D environment I can confirm that it wouldn't have been an easy task setting the cutting templates up for this project.

Someone has already made a piece of software that makes this kind of construction easier with a low cost entry barrier and low learning curve. However, the software is limited in its functions, based on Processing and only runs on one operating system. While it shows promises of being something great it will require substantial development. Something that I hope the software developers are working on now. I shall post more about this radical software in the coming days.

Tuesday 21 September 2010

Exploration of Shape Intersection

So, as I alluded to in my last post, one of the stools I've been tinkering with has taken a slightly different direction to the original sketches. Below is an experiment in shape intersection and a combination of slotting for ease of construction, which incidentally provides an enormous amount of natural rigidity and strength, and steam bending.

I have a fascination for organic shapes and these experiments will be a good lead into the final work pieces. Steam bent wood brings a whole other level of natural movement and shape. Something that I will be exploring further in the coming months.

enjoy the eye candy of what would be, if i built it now, a plywood stool with steam bent dowel. I have another seat that I've been tinkering with that really pushes the idea of slotting as a valid construction method.


Eco Stools - a furniture series with a big future

So as part of my study into organic connections and naturally strong structures I'm working on a series of stools that will be the base of my eco-stool range. My aim for this range is to produce a series of functional stools and chairs that are visually appealing, functional and environmentally sustainable. The first part of this process is to work on the designs in a digital environment allowing me to accurately model the structure and thus calculate load forces, experiment with different materials and varrying finishes. This will help me keep the waste, cost and environmental impact to a minimum.

At the moment I'm totally taken with two different yet highly versatile materials - bamboo and plywood.

Plywood has been around since 3500BC where there is evidence of sawn veneers being glued together crosswise to form wooden articles. The primary purpose was to give the illusion of high quality when infact the substrate that the veneers were being glues to was of a low quality. Why'd they do this? The abundance of fine/high quality wood was somewhat lacking and by using a lower quality wood with veneer the effect of opulance was achieved easily.

Plywood didn't become as we know it today until the 1900s with the invention of the rotary lathe by Immanuel Nobel (father to Alfred Nobel the man behind the Nobel prize). This particular lathe helped revolutionise the way in which veneers where cut and opened up a whole new world of possibilities to the wood species from which veneers could be sourced.

Bamboo has equally been around for a very long time with its origins dating back several thousand years to the chinese. Where it was used for many different things ranging from writing on, shoes, tiles, coats, and cooking. Bamboo is one of the fastest growing plants on the face of the earth and as such makes it an ideal resouce for mass harvesting and leaving little to no impact on the environment.

However, it is only in recent years that the harvesting and manufacture of bamboo products has really come to the fore. Whilst bamboo fabrics, small workable pieces of timber and matting is readily available, the production of bamboo in a plywood form or in a solid sheet form still remains somewhat of a new thing and not easily sourced.

The good news for me though is that there are a number of people embracing this material and are beginning to produce the kind of product that make it possible to produce high quality furniture items. One such manufacturer/grower is based right here in Queensland Australia and is quite literally just over an hour away from my home.

I'm hoping in the coming months to make a trip up to meet with these people to chat to them about the process of harvesting and manufacture of Bamboo and to see what they have on offer that I might be able to use in this series of furniture.

My goal is to have 3 prototypes made before Christmas of 2010 with a release of 5 stools/chairs within the first quarter of the new year. The plan to have items for sale is fast becoming a reality and I've hooked up with an importer/distributer of high end furniture in Brisbane and am in discussions with them about the possibility of them promoting/distributing my work to the greater Australian region. I'm also making inroads to potentially having a friend in Milan do some promoting for me to the local stores. Oh how nice it would be to be at the Milan Furniture Fair exhibiting my goods.

So here's a sneak peak at one of the stools I'm working on right now (it has since taken a slightly different diretion though) with a second and third currently in early conceptualisation stages. Not only am I exploring the possibilities of plywood and bamboo as building materials but I'm exploring the use of alternate media for finishing the pieces - including using felt, bamboo fabrics, recycled/reclaimed/eco threads, ribbons and buttons.